Kinemaster
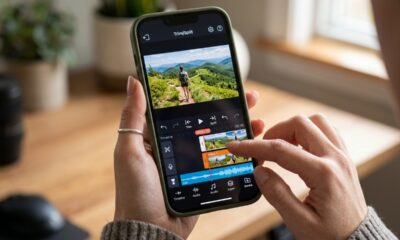
The Ultimate KineMaster Green Screen Effect Showcase
Master the kinemaster green screen effect in KineMaster! Step-by-step guide, creative uses, troubleshooting & free stock videos.

What the KineMaster Green Screen Effect Can Do for Your Videos
The kinemaster green screen effect lets you remove any green background from your footage and replace it with any image, video, or visual you want — right from your phone.
Here’s a quick overview of how it works:
- Import your background media (image or video) as the base layer
- Add your green screen clip as a layer on top
- Tap the Chroma Key option in the layer toolbar
- Activate it to remove the green background
- Adjust settings like Strength, Similarity, and Edge Thickness for a clean result
- Export your finished video
With over 700 million downloads worldwide, KineMaster is one of the most popular mobile video editors — and its built-in chroma key tool is one of the main reasons creators keep coming back. Whether you want to film yourself in front of a city skyline, add weather effects, or build a cinematic scene without leaving your bedroom, the green screen feature makes it possible on any Android or iOS device.
The best part? You don’t need a fancy studio. With good lighting, a solid green background, and the right settings, the results can look surprisingly professional.
I’m Faisal Shahzad, and through my work at KineMaster APK I’ve helped thousands of beginners get clean, professional results with the kinemaster green screen effect — from basic background swaps to full cinematic composites. In this guide, I’ll walk you through everything step by step so you can skip the trial and error.

Mastering the kinemaster green screen effect: Step-by-Step
Mastering the kinemaster green screen effect is about understanding how layers work. In KineMaster, the background is your “Media” (the foundation), and your green screen footage is a “Layer” that sits on top of it. If you try to put the green screen footage in the primary media track, the Chroma Key option won’t even appear!
To get started, follow these foundational steps for Chroma key in KineMaster:
- Project Setup: Open KineMaster and start a new project. Choose the aspect ratio that fits your platform (16:9 for YouTube, 9:16 for TikTok or Reels).
- Import Background Media: Tap the “Media” button on the tool wheel. Select the image or video you want to appear behind your subject. This is your foundational layer.
- Add the Green Screen Layer: Move the playhead to where you want the effect to start. Tap “Layer,” then tap “Media” (the top icon in the layer menu). Select your green screen clip.
- Positioning: Once the green screen clip appears on the timeline, you can drag it to resize it or move it around the screen.

Activating the kinemaster green screen effect
Now for the magic part. With your green screen layer selected (it should have a yellow border around it in the timeline), a menu will appear on the right side of the screen.
- Find Chroma Key: Scroll down the right-hand menu until you see “Chroma Key.”
- Enable: Toggle the “Enable” switch to ON. You will immediately see the green start to disappear.
- Key Color: Ensure the “Key Color” box matches the shade of green in your video. While KineMaster usually detects this automatically, you can manually pick the exact shade if the removal looks patchy.
- The Sliders: You’ll see two percentage sliders. The top slider adjusts the foreground (your subject), and the bottom slider adjusts the background transparency. Move these until the green is gone but your subject remains solid.
If you don’t have your own footage yet, you can Find Free Green Screen Stock Videos from massive repositories like Pixabay, which offers over 9,000 free clips ranging from explosions and animal animations to social media “Subscribe” buttons.
Fine-Tuning Your kinemaster green screen effect
A common mistake beginners make is stopping as soon as the green disappears. To make it look professional, you need to go deeper into exploring creative possibilities through fine-tuning.
- Show Mask: Tap the “Show Mask” button. This turns your video black and white. Your subject should be perfectly white, and the background should be perfectly black. If you see gray spots in the black area, adjust your sliders until they vanish.
- Detail Curve: This is for the pros. It allows you to adjust the transparency of the edges more precisely. If you have “fuzzy edges” around hair or clothing, tweaking the curve can sharpen them up.
- Edge Thickness: Use this to slightly shrink or expand the mask edges to remove any lingering green “spill” that makes your subject look like they have a glowing green aura.
Creative Use Cases for Professional Compositing
The kinemaster green screen effect isn’t just for weather reporters. It’s a gateway to high-end storytelling. Because KineMaster supports 4K export and multiple video layers, you can build complex scenes that look like they were made on a desktop.
- Social Media Brilliance: Create custom “Like” and “Follow” animations or place yourself inside trending meme backgrounds.
- Music Videos: Musicians often use the kinemaster green screen effect to place themselves in surreal, abstract environments or change the “weather” of a scene to match the mood of the song.
- Educational Tutorials: Teachers and tech reviewers use it to put themselves in the corner of the screen while showing a presentation or product in the background.
- Cinematic Storytelling: Want a hero running away from a dinosaur? Or a traveler standing on Mars? By combining KineMaster’s layering with high-quality stock footage, these “impossible” shots become easy.
To elevate your projects, you should utilize stock footage in your projects to find high-resolution 4K backgrounds that match the lighting and perspective of your foreground subject.
Troubleshooting Common Chroma Key Issues
Even with the best software, green screen editing can be tricky. Most issues aren’t caused by the app, but by how the footage was filmed. To help you get a “green screen maker” level of quality, we’ve compiled these green screen maker tips.
The most common issue is the “Ghost Face” effect, where the subject becomes partially transparent. This usually happens because the “Similarity” slider is set too high or the subject is wearing something that too closely matches the green background.
| Lighting Setup | Result Quality | Common Issues |
|---|---|---|
| Natural/Uneven Light | Low | Shadows on the screen, “fuzzy” edges, flickering. |
| Single Front Light | Medium | Subject looks flat, shadow cast onto the green screen. |
| Three-Point Lighting | High | Subject is separated from the background; clean, crisp edges. |
| Ring Light Only | Medium | Good for close-ups, but can cause green spill on shoulders. |
Pro Tips for a Clean Key:
- Lighting is Everything: Your green screen must be lit evenly. If one side is dark and the other is bright, KineMaster will struggle to remove both shades of green at once.
- Distance Matters: Stand at least 3-5 feet away from the green screen. This prevents your shadow from falling on the screen and reduces “green spill” (green light reflecting onto your skin).
- No Wrinkles: If you are using a fabric backdrop, make sure it is pulled tight. Wrinkles create mini-shadows that look like dark streaks after the chroma key is applied.
- Match the Vibe: If your background video is a dark alley, but you filmed yourself in a bright sunny room, the edit won’t look real. Use KineMaster’s “Adjustment” tool to lower your brightness and saturation to match the background.
Frequently Asked Questions about KineMaster Green Screen
Can I use green screen in the free version of KineMaster?
Yes! The kinemaster green screen effect (Chroma Key) is available in the free version of the app. However, videos exported from the free version will include a KineMaster watermark. If you want to export in 4K without watermarks and access the full Asset Store, many users choose to download the KineMaster Pro or Mod APK versions.
How do I fix the “Ghost Face” effect in my edits?
The “Ghost Face” effect occurs when the app thinks part of your face or body is part of the background. To fix this:
- Check your Key Color. Make sure it’s exactly the same green as your screen.
- Adjust the Similarity slider. Lower it until your face is solid again.
- Check your clothing. Ensure you aren’t wearing green or colors that have green undertones (like some shades of yellow or teal).
Where can I find free green screen stock videos for KineMaster?
You can find over 9,000+ free clips on Pixabay. These include everything from fire effects and transitions to animals and 3D animations. Simply download them to your phone’s gallery and import them into KineMaster as a “Layer.”
Conclusion
The kinemaster green screen effect is more than just a fun filter; it is a professional-grade tool that has democratized video production. Whether you are a YouTuber looking to spice up your content or a filmmaker on a budget, mastering the Chroma Key tool allows you to transcend the limits of your physical location.
By following the steps of importing background media first, fine-tuning with the detail curve, and ensuring your physical lighting is top-notch, you can create masterpieces that rival desktop edits. If you’re ready to take the next step and unlock the full potential of these tools without limitations, you can Download KineMaster Green APK to access premium features, including no watermarks and 4K support.
Don’t let your surroundings limit your creativity. Start transforming your videos today and see why millions of creators trust KineMaster for their visual storytelling. Happy editing!


-

 Best Kinemaster MODs6 months ago
Kinemaster for Beginners: Your First Video in 15 Minutes (No Experience Needed)
-
 Kinemaster Black2 years ago
KineMaster Black Download Latest Version v8.5
-
 Red Kinemaster Download2 years ago
Red Kinemaster Download Apk Latest Version v7.4.11.32428.GP Without Watermark
-
 Kinemaster Old Version2 years ago
KineMaster Old Versions 7.4.10.32410.GP Without Mark
-
 Kinemaster without watermark2 years ago
Kinemaster without watermark Download Latest Version 4.15.5.17370.GP
-
 Kinemaster Diamond Mod Apk2 years ago
Kinemaster Diamond Mod Apk Download Pro Version V7.4.0.32260.GP
-
Best Kinemaster MODs8 months ago
kinemaster pro apk download 2025 full unlocked + no watermark kinemaster mod apk
-
 Kinemaster Blue Apk2 years ago
Kinemaster Blue Apk Download Without Watermark | Latest Version]