Kinemaster For Pc
Stop the Stamp and Start the Show with KineMaster for PC
Install KineMaster no watermark for PC via emulators, edit in 4K, remove watermarks free, and unlock pro features for stunning videos!
What “KineMaster No Watermark for PC” Actually Means (And How to Get It)
KineMaster no watermark for PC is absolutely achievable — here’s the fastest way to get there:
| Method | Cost | Watermark-Free? | Safety Level |
|---|---|---|---|
| KineMaster Premium (via emulator) | Paid subscription | Yes | High |
| KineMaster Free Trial (via emulator) | Free (7-30 days) | Yes | High |
| KineMaster Mod APK (via emulator) | Free | Yes | Use caution |
| Chrome Extension (unofficial) | Free | Not confirmed | Low |
The bottom line: KineMaster has no official PC app. To run it on Windows or Mac, you need an Android emulator like BlueStacks. Once running, removing the watermark requires either a Premium subscription or a Mod APK — each with different tradeoffs.
If you’ve ever finished editing a video on your phone, only to export it and find that KineMaster logo stamped right across your footage — you know the frustration. The free version of KineMaster adds a watermark to every export. For casual use, that’s fine. But if you’re creating content for YouTube, TikTok, or a client, that little stamp can make polished work look unfinished.
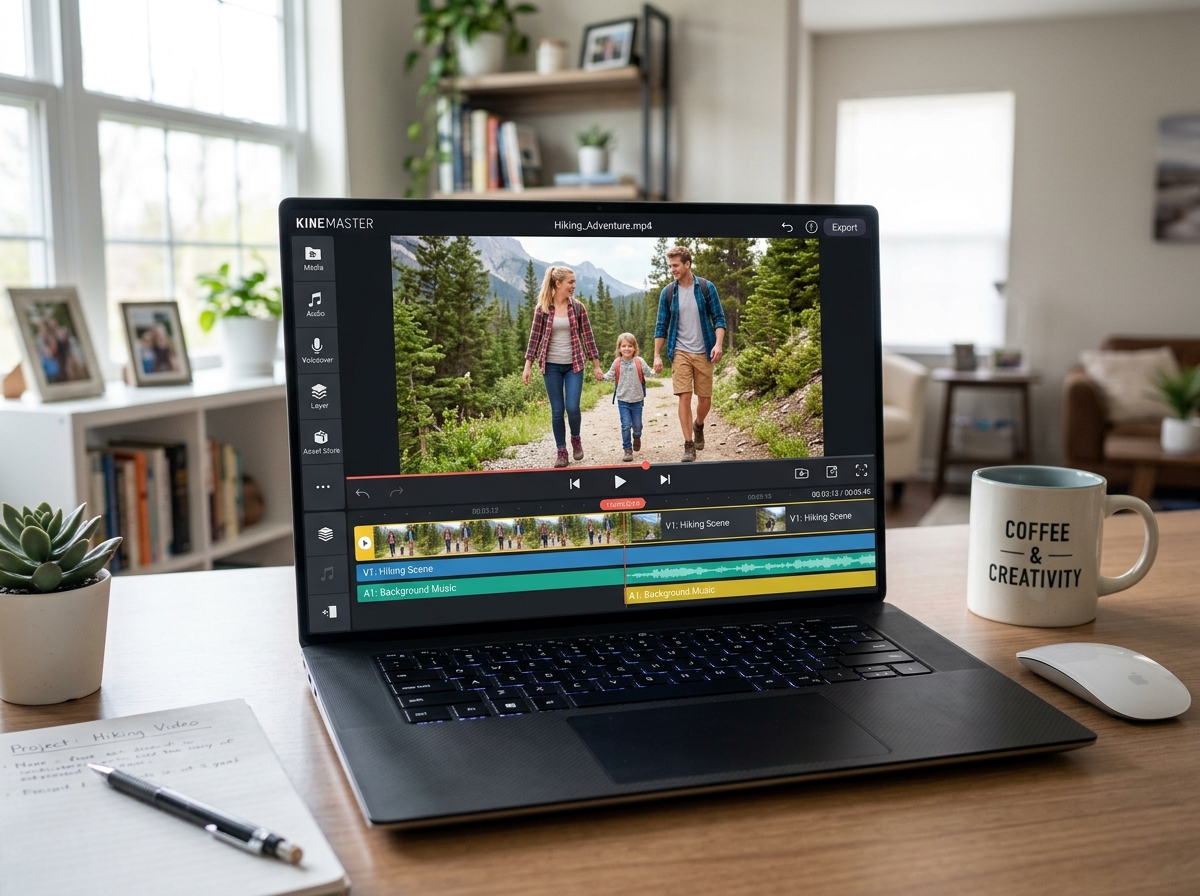
Moving to a PC setup makes editing faster, more precise, and easier on your thumbs. A bigger screen, a mouse, and a proper keyboard change everything about the editing experience. The catch? KineMaster was built for mobile. There’s no official Windows or Mac version — which is exactly why so many creators end up searching for workarounds.
This guide walks you through everything: how to run KineMaster on your PC, how to get rid of the watermark safely, what features you unlock, and what risks to watch out for.
I’m Faisal Shahzad, the team behind KineMaster APK, and I’ve spent years helping creators find the safest, most effective ways to use KineMaster no watermark for PC — from emulator setup to 4K exports. Let’s get your videos looking exactly the way they should.

How to Install KineMaster No Watermark for PC Using Emulators
Since KineMaster is exclusively designed for Android and iOS, we have to bring the mobile environment to your desktop. This is where Android emulators come in. An emulator is essentially a piece of software that creates a “virtual smartphone” inside your Windows or Mac computer.
While there are many options out there, we recommend sticking to the industry standards for stability and performance. KineMaster for PC Brings Video Editing to the Big Screen because it allows you to utilize your computer’s superior processing power to handle heavy video files that might make a phone overheat.
Choosing the Right Emulator
The two most popular choices are BlueStacks and NoxPlayer. BlueStacks is generally considered the fastest and safest platform, optimized specifically for high-performance apps. NoxPlayer is a great alternative if you have a slightly older machine, as it is often praised for its lightweight resource usage.
System Requirements for a Smooth Experience
Don’t let the “mobile app” label fool you. Video editing is resource-intensive. To run kinemaster no watermark for pc without lag, your computer needs to meet certain specifications. Based on our research, BlueStacks 5 requires at least 4GB of RAM, though 8GB is highly recommended for 4K rendering.
| Component | Minimum Requirements | Recommended for 4K |
|---|---|---|
| OS | Windows 7 / macOS 10.12 | Windows 10/11 / macOS 12+ |
| Processor | Intel/AMD Dual Core | Intel i5/i7 or AMD Ryzen 5+ |
| RAM | 2GB – 4GB | 8GB or more |
| Storage | 2GB – 5GB Free Space | 10GB+ (SSD preferred) |
| Graphics | Integrated Graphics | Dedicated GPU (Nvidia/AMD) |

Step-by-Step: Setting Up KineMaster No Watermark for PC
Ready to get started? Follow these steps to set up your desktop editing suite. We’ve designed this process to be as straightforward as possible, ensuring you can go from “download” to “done” in under ten minutes.
- Download the Emulator: Head to the BlueStacks Official Site and download the latest version. Follow the on-screen prompts to install it on your drive.
- Google Sign-In: Once launched, you’ll be asked to sign into your Google account. This is important if you already have a KineMaster Premium subscription, as it allows you to sync your purchase to the PC.
- Download the APK: If you are looking for the version with all features unlocked, you will need to download the KineMaster Pro APK from a trusted source.
- Install the App: In your emulator, look for the “Install APK” button (usually on the side toolbar). Select the file you just downloaded. If you get a security warning, you may need to go into the emulator’s settings and “Allow installation from unknown sources.”
- Import Your Media: Before you start editing, use the emulator’s “Media Manager” to drag and drop your video clips from your PC folders into the virtual Android storage.
- Start Editing: Open KineMaster, choose your aspect ratio, and start building your timeline.
For more detailed tricks on bypassing the logo, check out The Ultimate Guide to Removing KineMaster Watermarks for Free.
Safety and Legality of Watermark Removal
We have to talk about the “elephant in the room”: Mod APKs. These are modified versions of the official app that have the “premium” flag turned on by default, removing the watermark and unlocking all assets without a monthly fee.
While these versions are incredibly popular — with over 647,000 downloads for various KineMaster PC extensions — they do come with risks. Because they aren’t downloaded from the official Play Store, they could potentially contain malware or spyware if sourced from shady websites.
Always scan your APK files with a reputable antivirus before installing them. Our version of the KineMaster Without Watermark APK is tested for stability, but we always remind our users that the official subscription is the only way to support the developers directly and ensure 100% legal compliance.
Professional Features and 4K Exporting
The real magic of using kinemaster no watermark for pc is accessing high-end features on a professional-sized canvas. When you aren’t squinting at a 6-inch screen, you can see the fine details in your color grading and the exact frame where a transition should land.
Multi-Layer Editing and Chroma Key
One of KineMaster’s standout features is its multi-layer timeline. You can stack video clips, images, stickers, special effects, and text on top of each other. On a PC, dragging these layers around with a mouse provides a level of precision that touchscreens simply can’t match.
The Chroma Key (Green Screen) tool is a favorite for YouTubers and gamers. By recording in front of a green backdrop, you can use KineMaster on PC to swap that background for a virtual set or dynamic animation. The “Mask Enabler” allows you to fine-tune the edges so the subject looks perfectly integrated into the new environment.
Exporting 4K Video with KineMaster No Watermark for PC
Exporting is where the “no watermark” part really matters. If you are using our KineMaster Pro APK Download No Watermark, you can export in resolutions up to 4K (2160p).
When you’re ready to produce your masterpiece, pay attention to these settings:
- Resolution: Select 4K or 1080p for the best clarity on YouTube and Facebook.
- Frame Rate: Stick to 30FPS for standard vlogs. If you’re editing gaming content or action sports, boost it to 60FPS for that butter-smooth look.
- Bitrate: Don’t go too low, or you’ll see “blocks” (artifacts) in dark scenes. A medium-to-high bitrate ensures your 4K footage actually looks like 4K.
Advanced Audio and Visual Tools
We often focus so much on the “video” that we forget the “audio.” KineMaster on PC includes a robust set of audio tools, including:
- Voiceover Recording: Use your PC’s high-quality USB microphone to record narrations directly into the timeline.
- Equalizer Presets: Quickly fix “thin” audio or boost the bass for music tracks.
- Speed Control: Create dramatic slow-motion (down to 0.25x) or energetic time-lapses (up to 4x) without losing pitch in your audio.
- Instant Preview: Unlike some desktop editors that require “rendering” just to see a change, KineMaster offers a real-time preview of your edits.
If you find yourself stuck with a logo on an old project, you can learn how to Remove KineMaster Watermark in 2 Easy Ways to clean up your portfolio.
Troubleshooting and Performance Optimization
Running a mobile app through an emulator can sometimes lead to technical hiccups. If you experience lag or crashes while using kinemaster no watermark for pc, don’t panic. Most issues are related to how your PC allocates resources to the emulator.
Reducing Lag and Crashes
- Allocate More RAM: Go into your emulator settings (the gear icon) and ensure you have allocated at least 4GB of RAM and at least 4 CPU cores to the program.
- Update Graphics Drivers: Video rendering relies heavily on your GPU. Make sure your Nvidia, AMD, or Intel drivers are up to date.
- Clear Cache: If the app starts acting sluggish, go to the emulator’s Android settings > Apps > KineMaster and “Clear Cache.” This won’t delete your projects, but it will clear out temporary “junk” files.
- Enable Hardware Acceleration: Ensure “VT-x” (Virtualization Technology) is enabled in your PC’s BIOS settings. This allows the emulator to run at near-native speeds.
Fixing Export Failures
If your export fails at 99%, it’s usually a storage or bitrate issue. Ensure you have at least 5GB of free space on your PC’s hard drive. If it still fails, try lowering the bitrate slider slightly or changing the frame rate from 60FPS to 30FPS.
Frequently Asked Questions about KineMaster for PC
Is there an official KineMaster app for Windows or Mac?
No, there is currently no native desktop application for KineMaster. Any website claiming to offer a “.exe” or “.dmg” file for KineMaster is likely providing a bundled emulator or, worse, malware. The only way to run the official app on PC is through an Android emulator like BlueStacks or NoxPlayer.
How can I remove the KineMaster watermark on PC for free?
There are two primary ways. The first is to use the official 7-day or 30-day free trial of KineMaster Premium within the emulator. The second method is to download a “Mod APK” which has the watermark removal feature pre-unlocked. While the Mod APK is free, it carries higher security risks than the official subscription.
What are the risks of using a KineMaster Mod APK on my computer?
The main risks are security and stability. Modded apps are altered by third parties, meaning they could contain hidden scripts or malware. Additionally, because they don’t receive official updates from the developers, they may crash more frequently or stop working when the emulator updates its version of Android. Always use a secondary Google account and scan files before use.
Conclusion
Stepping up to kinemaster no watermark for pc is a game-changer for any serious content creator. By combining the intuitive, user-friendly interface of KineMaster with the raw power and screen real estate of a desktop computer, you unlock a level of creative freedom that mobile devices just can’t match.
Whether you choose the official premium route or decide to explore a No Watermark KineMaster Download, the goal remains the same: professional, clean, and engaging storytelling. No more distracting logos, no more thumb fatigue — just high-quality 4K content ready for the world to see.
Ready to take your videos to the next level? Start your professional editing journey today and see what you can create when the limitations are removed. Happy editing!


-

 Best Kinemaster MODs6 months ago
Kinemaster for Beginners: Your First Video in 15 Minutes (No Experience Needed)
-
 Kinemaster Black2 years ago
KineMaster Black Download Latest Version v8.5
-
 Red Kinemaster Download2 years ago
Red Kinemaster Download Apk Latest Version v7.4.11.32428.GP Without Watermark
-
 Kinemaster Old Version2 years ago
KineMaster Old Versions 7.4.10.32410.GP Without Mark
-
 Kinemaster without watermark2 years ago
Kinemaster without watermark Download Latest Version 4.15.5.17370.GP
-
 Kinemaster Diamond Mod Apk2 years ago
Kinemaster Diamond Mod Apk Download Pro Version V7.4.0.32260.GP
-
Best Kinemaster MODs8 months ago
kinemaster pro apk download 2025 full unlocked + no watermark kinemaster mod apk
-
 Kinemaster Blue Apk2 years ago
Kinemaster Blue Apk Download Without Watermark | Latest Version]