Blog
How to Animate Text in Shotcut Using Keyframes
Learn shotcut animated text with keyframes: create typewriter effects, motion tracking, video-in-text, and reusable templates for pro titles.

Core Methods for Creating Shotcut Animated Text
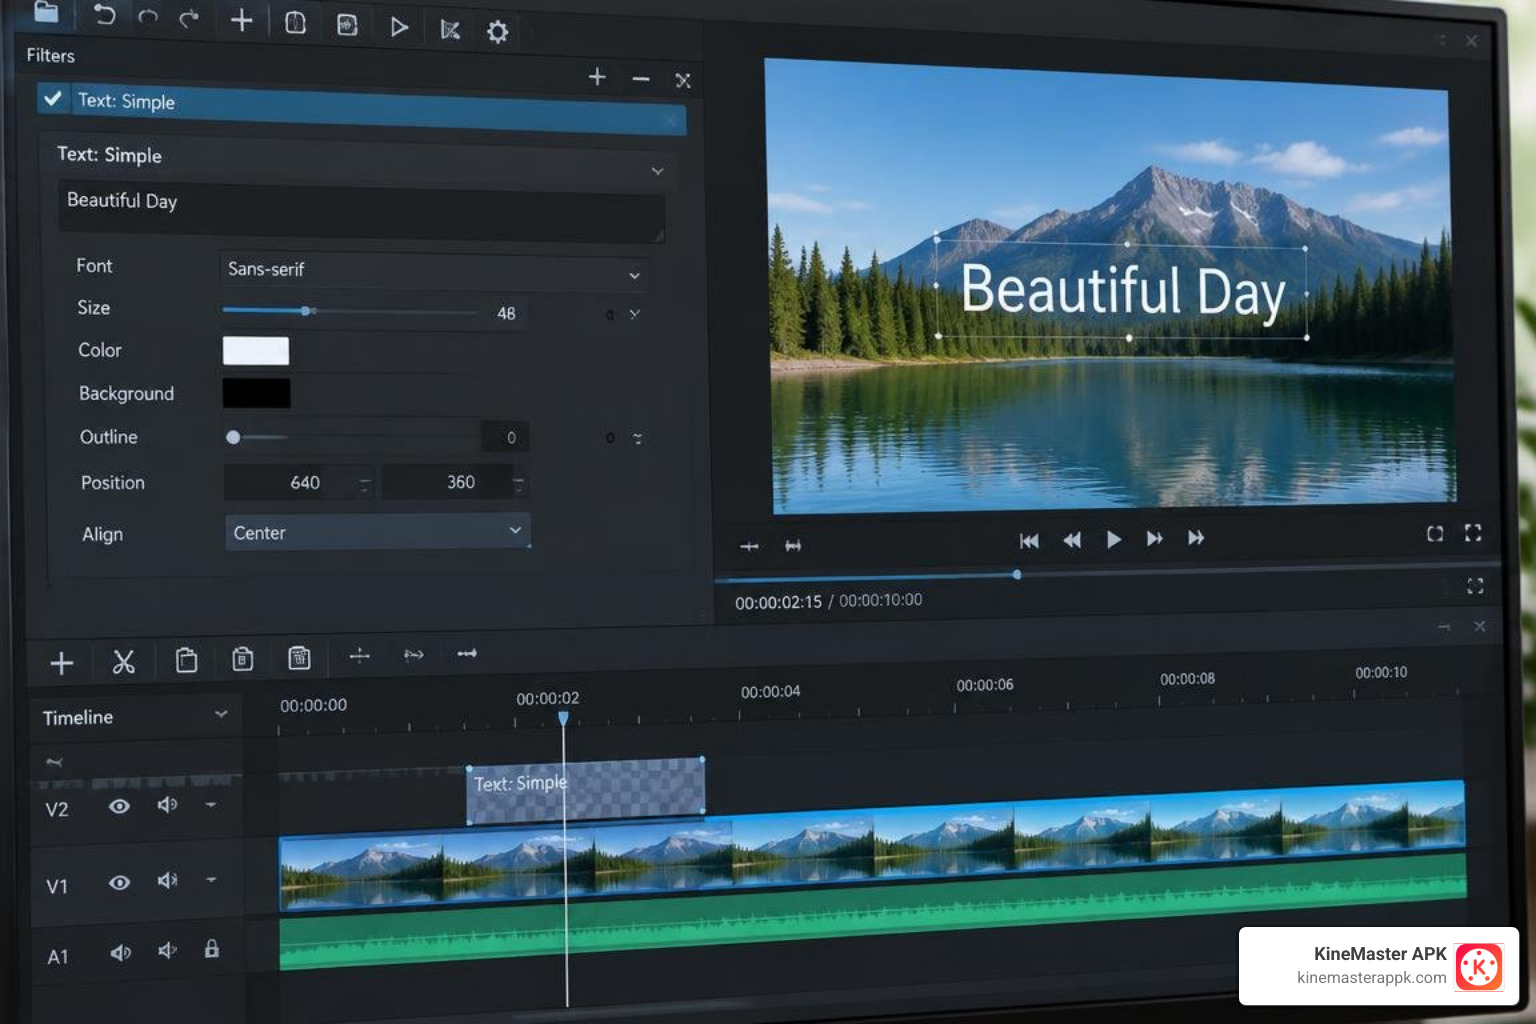
To animate text in Shotcut, add a transparent color clip to a video track above your footage, apply the Text: Simple filter to enter your title, then add the Size, Position & Rotate filter and click the stopwatch icon next to Position / Size to open the Keyframes timeline. Move the playhead to different frames, adjust the position or size values, and Shotcut will interpolate the motion between keyframes. This keyframe workflow is the foundation for most Shotcut animated text effects, from zooms and slides to reveals.
Building dynamic titles in open-source video software does not require an advanced motion-graphics studio. In Shotcut, most motion graphics rely on combining a few foundational video filters: Text: Simple, Size, Position & Rotate (commonly abbreviated as SPR), and Crop: Rectangle. Learning these desktop fundamentals pairs nicely with understanding how to create text animations across different creative setups.
Once you add your transparent clip to the timeline and select it:
- Open the Filters panel and click the + (plus) icon.
- Search for and apply Text: Simple.
- Enter your title, choose your typography, and set the text color.
- Add the Size, Position & Rotate filter to control screen coordinates over time.
- Click the small stopwatch icon next to Position / Size to open the Keyframes timeline.
Shotcut makes fine numeric adjustments straightforward. Instead of wrestling with on-screen bounding boxes that jitter when your hand moves, you can hover over any numeric field in the filter settings and roll your mouse scroll wheel to adjust values pixel by pixel. Using the up and down arrow keys achieves the exact same precision.
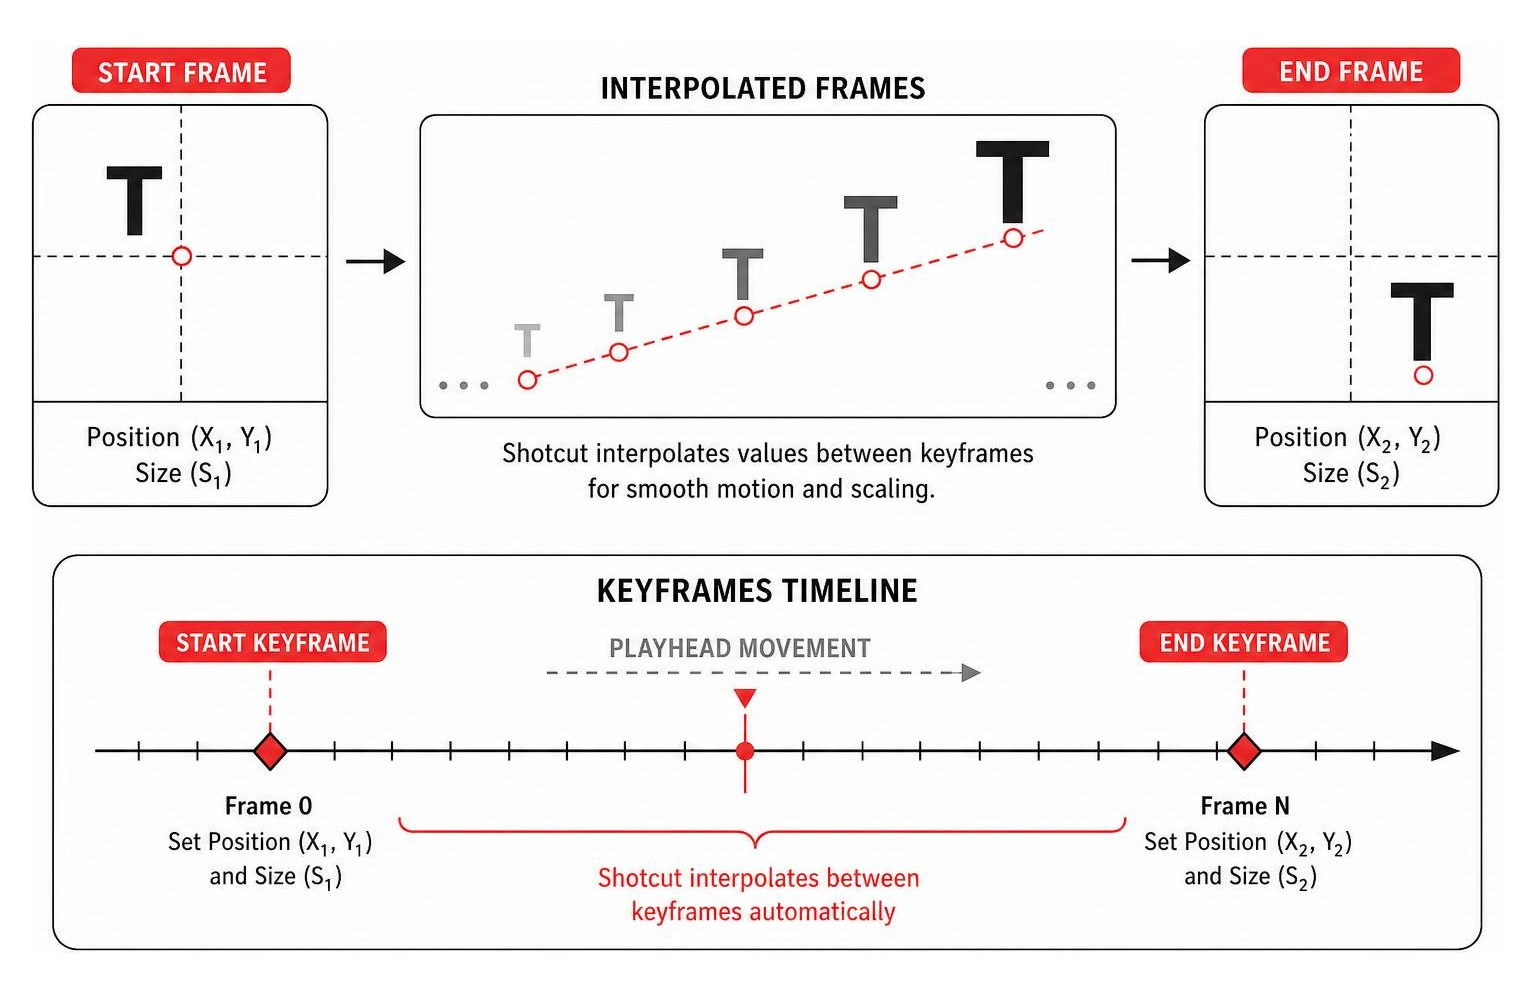
Keyframing Text Position and Zoom Transitions
A subtle scale or slide transition turns static titles into cinematic graphic overlays. To create a smooth zoom transition, move the playhead to the start of your text clip on the Keyframes timeline, set your starting size coordinates, advance the playhead forward by twenty to thirty frames, and increase the size parameter slightly.
During a popular Shotcut text animation challenge, community creators demonstrated that bold sans-serif typefaces like Segoe UI Black or Arial Black hold up best during zoom-ins because thick letterforms maintain clean contrast against busy video backgrounds. Setting linear keyframes with small coordinate changes ensures consistent velocity and eliminates visual jumps.
Creating Reveal and Slide Effects with Masks
If you want your text to emerge gracefully from behind an invisible boundary (a classic lower-third aesthetic), combine your text filter with masking tools on a single clip:
- Mask: Simple Shape: Defines the visible viewing window. Set the shape to Rectangle, expand the horizontal width, and position it directly where the text should appear.
- Crop: Rectangle: Alternatively, keyframe the top, bottom, or side margins of a crop boundary to wipe text on or off the screen.
- Mask: Apply: Closes the mask calculation chain when complex multi-filter stacks are used.
Filter order is essential in Shotcut. Filters process from top to bottom. If your text fails to reveal properly, check your stack: placing Mask: Simple Shape before Mask: Apply ensures the alpha channel calculates correctly before passing frames down to the master composite engine.
Advanced Techniques: Typewriter Subtitles and Motion Tracking
Modern video editing often calls for dynamic captions that align seamlessly with spoken dialogue or follow subjects across the frame.
Generating Typewriter Effects with Subtitle Burn-In
Introduced in Shotcut 24.08, the dedicated Subtitle Burn-In filter revolutionized automated text delivery. Instead of manually cutting dozens of text clips to reveal letters sequentially, this filter provides built-in typewriter capabilities directly tied to subtitle tracks (.srt files) or text elements.
The Subtitle Burn-In Video Filter lets you customize several key animation parameters:
- Animation Modes: Choose between Character by Character, Word by Word, or Line by Line reveals.
- Typewriter Rate: Adjusts the exact frame delay between each element’s appearance (values range from 1 to 1000). Lower values create rapid typing, while higher values produce a steady, deliberate pace.
- Rate Variation: Adds natural irregularity to mimic real human keystrokes.
- Cursor Styling: Enable terminal-style cursors (vertical line, block, bullet, or diamond) and customize the blink rate to match your aesthetic.
Attaching Text to Moving Objects via Motion Tracking
Shotcut allows you to attach text overlays to moving subjects without manually keyframing hundreds of individual frames:
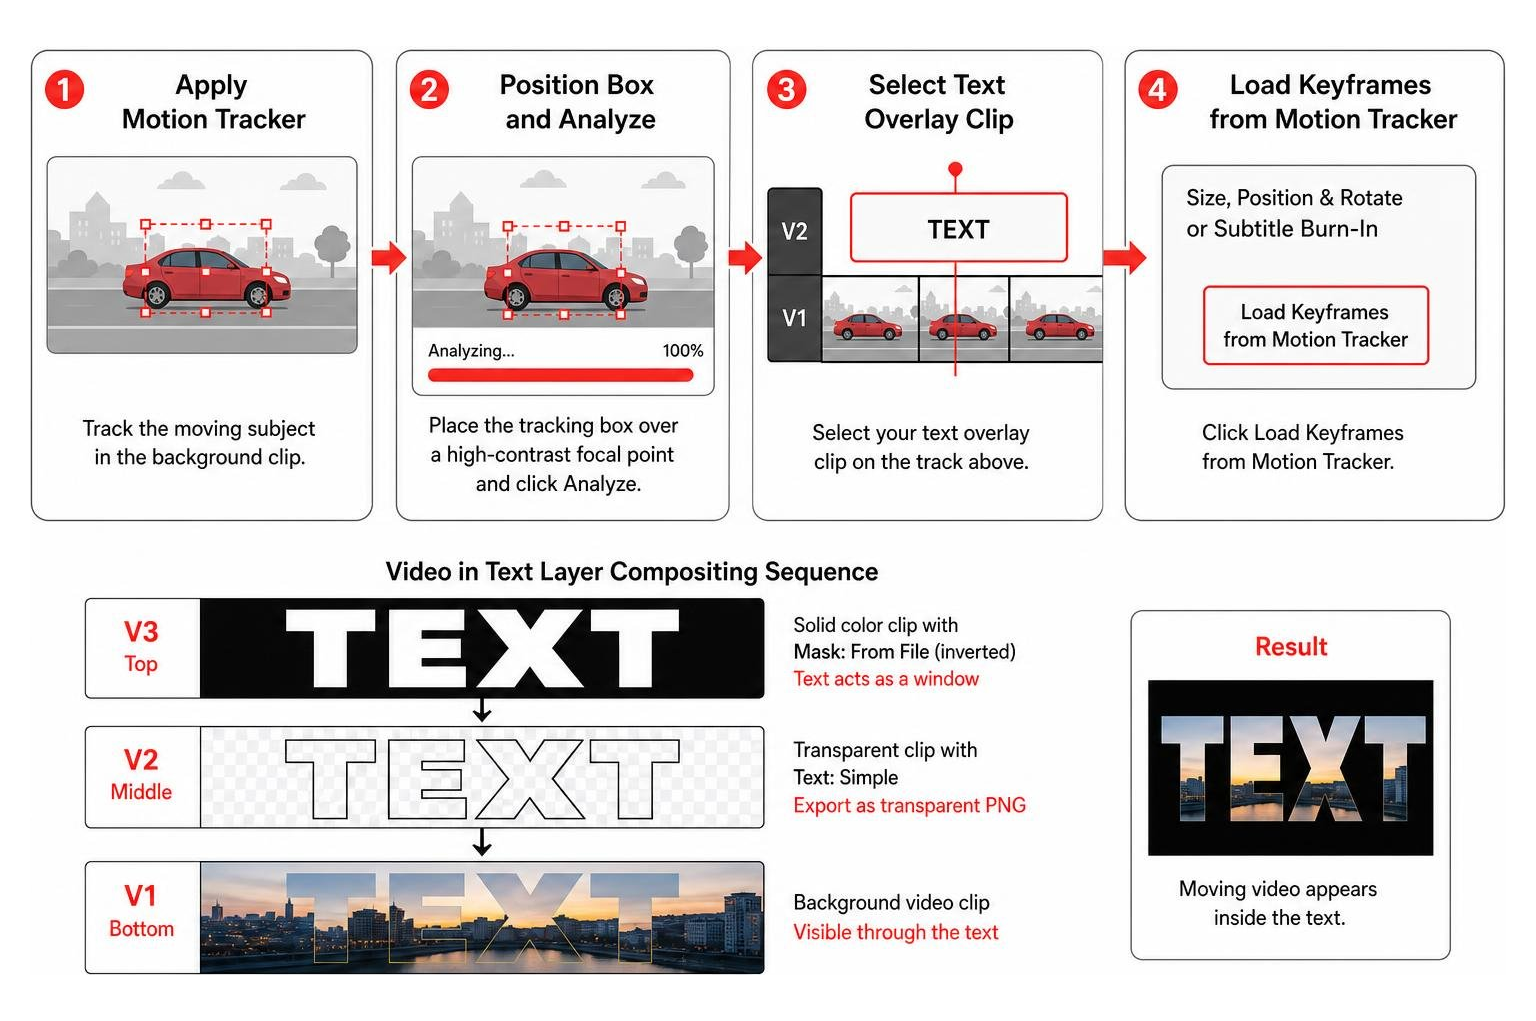
- Apply the Motion Tracker filter to the background video clip containing the moving subject.
- Position the tracking box over a high-contrast focal point (like a vehicle or a person’s shoulder) and click Analyze.
- Once the tracking algorithm calculates motion coordinates, select your text overlay clip on the track above.
- In the text clip’s Size, Position & Rotate or Subtitle Burn-In filter, click Load Keyframes from Motion Tracker.
This coordinate mapping pins the text directly to the moving target, creating floating tags and dynamic labels.
Creative Effects: Video in Text and Animated Borders
Displaying moving footage inside bold typographic letterforms creates stunning intro cards and promotional sequences.
| Technique | Track Setup | Processing Complexity | Best Use Case |
|---|---|---|---|
| Mask: From File (Alpha Matte) | 3 Video Tracks (V1, V2, V3) | Medium (Requires PNG frame export) | Intricate title sequences with textured video fills |
| Chroma Key Text | 2 Video Tracks (V1, V2) | Low (Direct filter application) | Fast, high-contrast title cards with primary colors |
Creating a Video Background Inside Text
As outlined in the community’s video-in-text technique guide, you can build an internal video matte without using third-party image manipulation software:
- Place your background video clip on track V1.
- Add a transparent color clip on track V2 and apply Text: Simple using an extra-bold typeface with white fill and a transparent background.
- Export that single text frame as a transparent PNG image.
- Place a solid color clip (such as black or deep navy) on track V3, and apply the Mask: From File filter pointing directly to your exported PNG text image.
- Invert the mask setting so the letters become an open window revealing the moving video on V1 below.
Designing Animated Box Borders and Line Drawings
Clean rectangular outlines drawing themselves around lower thirds give videos an executive polish. By utilizing the community’s animated box border drawing resource, you can assemble outlines using dual SPR filters:
- Bottom SPR Filter: Governs overall box dimensions and frame-scale positioning.
- Top SPR Filter: Clips vertical and horizontal segments while controlling line thickness and draw speed.
By keyframing the horizontal and vertical crop parameters sequentially, the border traces around the title card smoothly at 30 or 60 frames per second.
Managing Templates and Legacy Animation Workarounds
Efficiency in video editing comes from saving your animation setups for future projects. If you want to streamline your production across platforms, exploring free video editors provides helpful perspective on desktop versus mobile workflows.
Building and Reusing Shotcut Animated Text MLT Templates
Shotcut stores project instructions in human-readable XML project files with the .mlt extension. You can turn entire animated titles into reusable assets:
- Build your title sequence inside an empty Shotcut project set strictly to 1920×1080 resolution.
- Keep your text and masking filters contained on a single track to minimize timeline clutter.
- Save the project file (e.g.,
Chapter_Title_Template.mlt). - In any future video edit, navigate to File > Open MLT XML As Clip and drop the saved file directly onto your timeline.
Applying the Blend Mode: Add filter to the imported MLT clip ensures transparent sections overlay cleanly without generating accidental black frames, making community templates like the animated text template resource remarkably versatile for chapter transitions.
Legacy HTML Filters and External Rendering Workarounds
In older releases prior to version 20.07.11, Shotcut supported a filter named Text: HTML, which leveraged a built-in WebVfx framework to render CSS3 and JavaScript animations. Due to upstream QtWebkit deprecation, this filter was removed.
For editors looking to recreate complex web-code animations, modern workarounds involve designing the animation in a web browser, capturing the screen losslessly or exporting transparent WebM files, and bringing those pre-rendered assets into Shotcut’s timeline.
Best Practices for Legible and Professional Animated Text
Even the smoothest keyframe motion looks unprofessional if viewers struggle to read your message. Delivering clean typography means following key visual rules:
- High-Contrast Typography: Pair white or bright yellow text with subtle black drop shadows or thin outlines (1 to 2 pixels) rather than thick backgrounds that obscure underlying footage.
- The Grayscale Legibility Test: Apply a temporary Saturation filter set to 0% (grayscale) on your master track. If your animated text is easy to read in black and white, it will remain clear across diverse display screens.
- Respect Title-Safe Margins: Keep all animated titles at least 10% inside the outer edge of the frame to prevent cropping on television screens and mobile displays.
- Pacing and Timing: Match the text duration to natural reading speeds—allow roughly one second of screen time for every three to four words.
Creating polished productions relies heavily on video editing without watermarks to maintain professional visual standards from the first frame to the final export.
Frequently Asked Questions About Shotcut Text Animation
How do I save animated text settings as a preset in Shotcut?
Once you configure your text styling, size coordinates, and keyframe motion inside any filter panel (such as Size, Position & Rotate), click the + icon next to the Preset dropdown menu at the top of the filter window. Give your preset a memorable name. You can instantly apply this preset to any future clip with a single click.
Can I create animated text in Shotcut on a single video track?
Yes. By stacking multiple filters (such as Text: Simple, Size, Position & Rotate, and Crop: Rectangle) directly onto a single transparent color clip, the entire animation runs on one track. This keeps your project timeline organized and reduces export rendering overhead.
Why does my text animation look jerky during playback?
Playback stutter usually stems from real-time timeline preview scaling rather than rendering defects. To fix this, enable Preview Scaling (set to 720p or 360p under Settings > Preview Scaling) while editing. Ensure your project’s frame rate matches your source footage to maintain consistent frame synchronization.
Master Fast Video Titling on Any Device
Shotcut provides deep, keyframe-accurate control over desktop motion graphics, letting you craft everything from subtle zoom reveals to animated subtitle tracks. If you want to bypass desktop timelines and create animated typography directly on your smartphone, our modded versions at KineMaster APK give you instant access to premium video editing tools, pre-built text motion templates, and crisp 4K watermark-free exports wherever you film.










 Best Kinemaster MODs8 months ago
Kinemaster for Beginners: Your First Video in 15 Minutes (No Experience Needed)

 Kinemaster Black2 years ago
KineMaster Black Download Latest Version v8.5

 Red Kinemaster Download2 years ago
Red Kinemaster Download Apk Latest Version v7.4.11.32428.GP Without Watermark
- Kinemaster Old Version2 years ago
KineMaster Old Versions 7.4.10.32410.GP Without Mark
- Kinemaster Diamond Mod Apk2 years ago
Kinemaster Diamond Mod Apk Download Pro Version V7.4.0.32260.GP
- Kinemaster without watermark2 years ago
Kinemaster without watermark Download Latest Version 4.15.5.17370.GP
- Best Kinemaster MODs11 months ago
kinemaster pro apk download 2025 full unlocked + no watermark kinemaster mod apk
- Kinemaster Blue Apk2 years ago
Kinemaster Blue Apk Download Without Watermark | Latest Version]