Kinemaster Apk Download
5 Essential Kinemaster Features Every New User Should Master (Skip the Overwhelm)
Hey there, new video editor!
If you’re staring at Kinemaster’s interface feeling like you’ve just been handed the controls of a spaceship when you only wanted to drive a car—breathe. I was you. I tapped every button, ruined a perfectly good sunset video with seventeen filters, and nearly gave up before discovering the secret: you don’t need to know everything. You just need to master the right things first.
After helping hundreds of beginners find their footing, I’ve learned there are five features that separate “frustrated quitter” from “confident creator.” These aren’t just tools; they’re your foundation. Master these, and you’ll be able to create 90% of the videos you imagine. The other hundred features? They’re just icing you can learn later.
Let’s move from overwhelmed to operational.
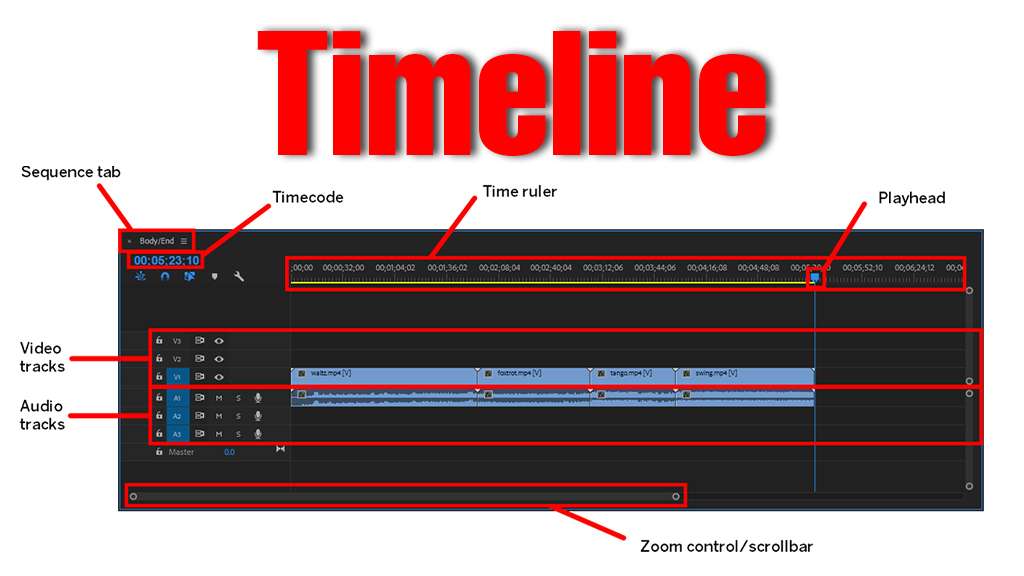
Feature 1: The Timeline – Your Editing Dashboard
Why This is Essential: Imagine trying to build a house without a foundation. That’s editing without understanding the timeline. Every single thing you do in Kinemaster lives here. It’s not just a strip of video; it’s your command center.
What New Users Get Wrong: They treat it as a passive player rather than the active control panel. They tap clips randomly instead of using the timeline intentionally.
Your Mastery Checklist:
- The Playhead is Your Scanner: That vertical line moving across your clips? That’s your “you are here” indicator. Drag it to preview any moment instantly. Editing is about precision, and the playhead is your laser pointer.
- Layers are Your Dimensions: See those parallel tracks? They’re your z-axis. Bottom layer = background. Higher layers = foreground. Your video clip is on layer 1. Add text? It goes on layer 2, above the video. Add a sticker? Layer 3. This is how you build depth. Confusion starts when layers collide. If your text disappears, something on a higher layer is covering it.
- Pinch-to-Zoom is Your Microscope: Spread two fingers on the timeline to see fractions of a second. Pinch to see minutes. Need to cut exactly when the beat drops? Zoom in. Want to rearrange big sections? Zoom out. This one gesture changes everything.
- The Mute & Hide Buttons: See the eye and speaker icons on each layer? Click the eye to hide a layer (perfect for focusing on your audio). Click the speaker to mute it. These are your “solo” and “mute” buttons for troubleshooting.
Practice This Now: Import two clips. Zoom the timeline all the way in. Cut one clip exactly at the 2-second mark. Move your text layer from above your video to below it. Use the eye icon to hide your video and only listen to your audio. You’ve just taken control.
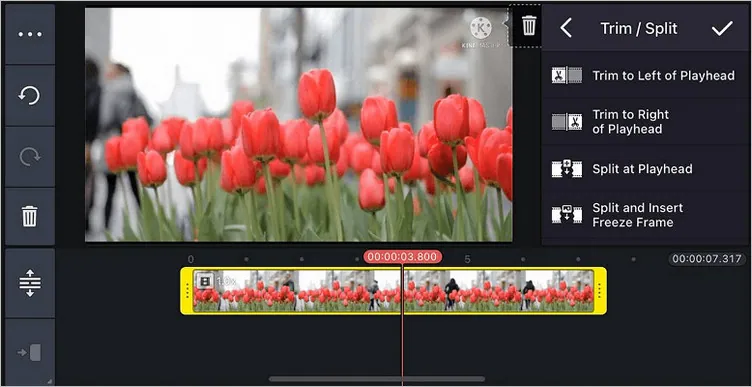
Feature 2: The Precision Scissor – Trimming & Splitting
Why This is Essential: Bad editing is obvious. Good editing is invisible. The difference is in the cut. The Scissor tool (the split button) is how you remove ums, ahs, dead air, and mistakes. It’s your most powerful storytelling tool.
What New Users Get Wrong: They treat trimming as a rough “chop” instead of a surgical slice. They cut near the action instead of on the action.
Your Mastery Checklist:
- Two Ways to Trim:
- The Drag Method: Tap a clip. Yellow handles appear at its edges. Drag them in. Simple for quick head/tail cuts.
- The Split Method (Pro Move): Move the playhead to your exact cut point. Tap the Split button (scissor icon). The clip fractures into two independent pieces. This is for removing middles, inserting B-roll, or creating rhythm.
- Cut on Motion, Not on Pauses: The best cuts happen when something is moving—a turn of the head, a gesture, a step. The motion carries the viewer’s eye across the cut, making it seamless.
- The 5-Second Rule: When starting, film for 5 seconds longer than you need at the start and end of every clip. This gives you “handle” material to trim, so you’re never cut short.
- Use the Gap: After splitting, you can delete a section and a gap remains. Drag the following clip to close the gap. Leftover gaps cause awkward pauses in your final video.
Practice This Now: Film yourself saying: “Hello… [pause]… today we’re learning about… [pause]… editing!” Place the playhead in the middle of each pause. Hit SPLIT. Delete the pause clip. Drag the remaining clips together. You’ve just tightened your speech. That’s professional pacing.
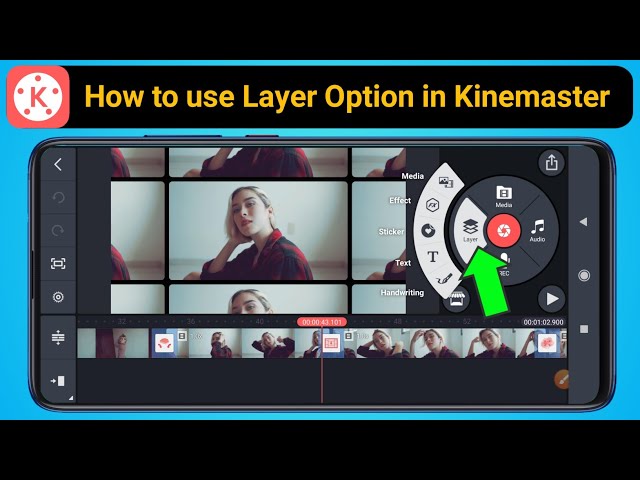
Feature 3: The Layer Button – Your Creative Portal
Why This is Essential: This purple “+” is the gateway to everything that isn’t your original video clip: text, stickers, overlays, handwriting, and effects. This is where you add personality, information, and style.
What New Users Get Wrong: They add everything at the very beginning of the timeline, creating a chaotic mess. They treat layers as static, not dynamic.
Your Mastery Checklist:
- Timing is Everything: Don’t add a text layer and leave it for the full 60 seconds. Add it where you need it. Tap the Layer button, add your text, then on the timeline, drag the edges of that text layer to make it appear and disappear exactly when it should. Text should enter, serve its purpose, and exit.
- The Hierarchy of Readability: Not all layers are equal. The most important information (a key point, a name) needs the highest visual priority. Make it bigger, bolder, and place it centrally. Secondary info (subtle watermarks, decorative elements) should be smaller and placed in corners.
- Blending Modes (Your Secret Weapon): Tap a layer, then the paintbrush. See “Blending”? Try “Multiply” to darken, “Screen” to lighten, or “Overlay” to add contrast. Dropping a white “Light Leak” overlay and setting it to “Screen” gives an instant professional, cinematic glow. This is where magic happens.
- The Power of Duplicate: Found the perfect settings for a lower-third title? Tap the layer, hit “Duplicate,” and change the text. Your style stays consistent. This is how pros create branded templates.
Practice This Now: Add a text layer that says “Essential Tip.” Shorten it to 2 seconds. Duplicate it twice. Change the text to “Practice This.” and “Master It.” Space them out on the timeline. You’ve just created a branded graphic motif.
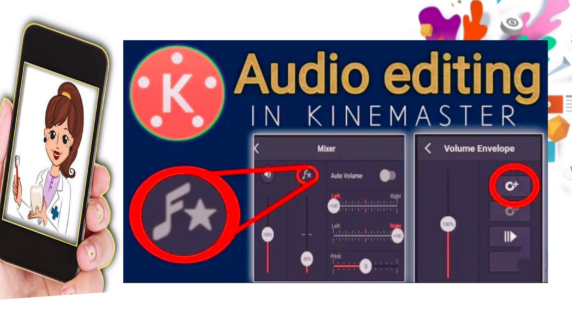
Feature 4: The Audio Mixer – The Invisible 70%
Why This is Essential: Viewers will forgive mediocre video quality, but they will flee bad audio. Audio isn’t 50% of your video—it’s more like 70%. The Audio tab (music note icon) and volume controls are your tools to sound professional.
What New Users Get Wrong: They blast stock music over their voice, creating a muddy, frustrating soundscape. They ignore audio levels entirely.
Your Mastery Checklist:
- The Golden Rule: Voice Over Music: Your spoken words are king. Music is the supporting actor.
- Voiceover Volume: Should peak in the yellow, never hit red.
- Background Music Volume: Set between 20-35%. It should be felt, not fought against.
- Fade In, Fade Out: Nothing screams “amateur” like music that starts and stops abruptly. Tap any audio clip, hit “Volume,” and use the Fade In and Fade Out sliders. A 1-second fade on both ends creates a gentle, professional bed of sound.
- Ducking (The Game-Changer): This is Kinemaster’s smartest audio feature. Tap your music track. See “Ducking”? Enable it and set the intensity. Now, whenever your voiceover plays, the music will automatically dip in volume, then rise back up when you stop talking. It’s like having an audio assistant.
- Separate Your Tracks: Don’t put all audio on one layer. Your voice on Layer 1, music on Layer 2, sound effects on Layer 3. This gives you independent control to adjust, mute, or fade each element.
Practice This Now: Add a voiceover saying “Audio is key.” Add a music track. Enable Ducking. Play it back. Hear how the music politely steps aside for your voice? That’s pro-grade mixing.
Feature 5: The Keyframe – Your Animation Engine
Why This is Essential: This is the feature that transforms static, boring content into dynamic, engaging storytelling. It’s what makes text slide in, images zoom with purpose, and videos pan smoothly. If layers are your objects, keyframes are their choreographers.
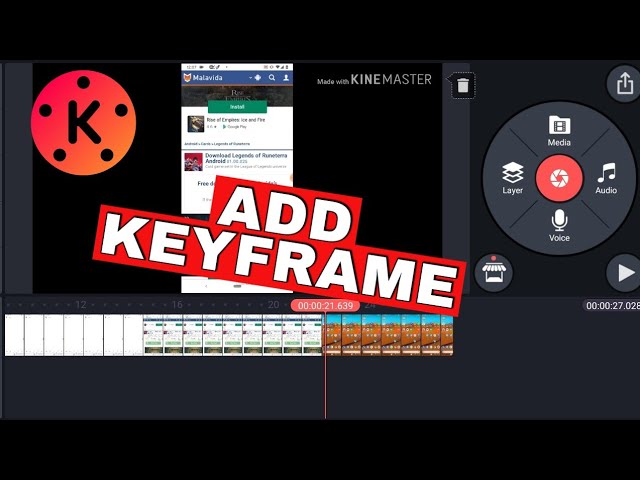
What New Users Get Wrong: They’re intimidated by the term “keyframe,” thinking it’s for advanced users. In reality, it’s just setting a start point and an end point.
Your Mastery Checklist:
- The Simple Analogy: A keyframe is a “remember this position” bookmark. You tell Kinemaster: “Here, at this second, remember my text is on the left side and small. Now, here, two seconds later, remember my text is in the center and big.” Kinemaster will smoothly animate between those two memories.
- The 3-Step Process:
- Set Start Point: Move the playhead to where you want the animation to begin. Tap your layer (text, image, video clip). Tap the diamond-shaped Keyframe button. A diamond appears on the timeline.
- Set End Point: Move the playhead to where you want the animation to end. Change your layer (move it, resize it, rotate it). Kinemaster will automatically add another keyframe.
- Watch the Magic: Play back. Your layer will now animate smoothly between those two points.
- Start Simple:
- Text Reveal: Start with text off-screen left (keyframe 1), end with it centered (keyframe 2).
- Zoom Punch-In: Start with your video clip at normal size (keyframe 1), end with it zoomed in 120% on a subject’s face (keyframe 2).
- Less is More: One smooth animation is better than three jittery ones. Use keyframes to guide the viewer’s eye, not to give them motion sickness.
Practice This Now: Add a photo. At the start, add a keyframe and make the photo tiny. Move 3 seconds forward, add another keyframe, and make the photo full screen. Play it. You’ve just created an elegant, animated intro. That’s the power.
Your First Week Action Plan
Don’t try to swallow this all at once. Edit with intention:
- Day 1-2: Live in the Timeline. Import, trim, split, and arrange clips. Get comfortable with the playhead and layers.
- Day 3: Play with Layers. Add text that comes and goes. Try one blending mode.
- Day 4: Become an audio engineer. Use the Audio Mixer, set levels, and apply your first fade.
- Day 5: Animate one thing with Keyframes. Make a title slide in.
- Day 6-7: Make a 30-second video using all five features.
Remember, every expert was once a beginner who focused on fundamentals. These five features are your toolkit. The timeline is your workbench. The rest of the buttons? They’re just specialized wrenches you’ll grab when you need them.
Now, go make something. The best way to master these isn’t by reading—it’s by doing. Your first video might be messy, but it will be yours. And that’s where every great editor’s story begins.

 Best Kinemaster MODs3 weeks ago
Kinemaster for Beginners: Your First Video in 15 Minutes (No Experience Needed)

 Kinemaster Black1 year ago
KineMaster Black Download Latest Version v8.5

 Red Kinemaster Download1 year ago
Red Kinemaster Download Apk Latest Version v7.4.11.32428.GP Without Watermark
- Kinemaster without watermark1 year ago
Kinemaster without watermark Download Latest Version 4.15.5.17370.GP
- Kinemaster Old Version1 year ago
KineMaster Old Versions 7.4.10.32410.GP Without Mark
- Best Kinemaster MODs3 months ago
kinemaster pro apk download 2025 full unlocked + no watermark kinemaster mod apk

 Blog1 year ago
Export 4K Video Using Kinemaster: 3 Tips for Amazing Results
- Kinemaster Blue Apk1 year ago
Kinemaster Blue Apk Download Without Watermark | Latest Version]